Featured

Impossible Lasagna: DF, GF, V, no sauce!

I am currently reacting to tomatoes, and my go-to roasted bell pepper sauce does not sound appetizing at all. So when I started craving lasagna, it took me several days to figure out how to work around all my parameters and food allergies.

But I did it!

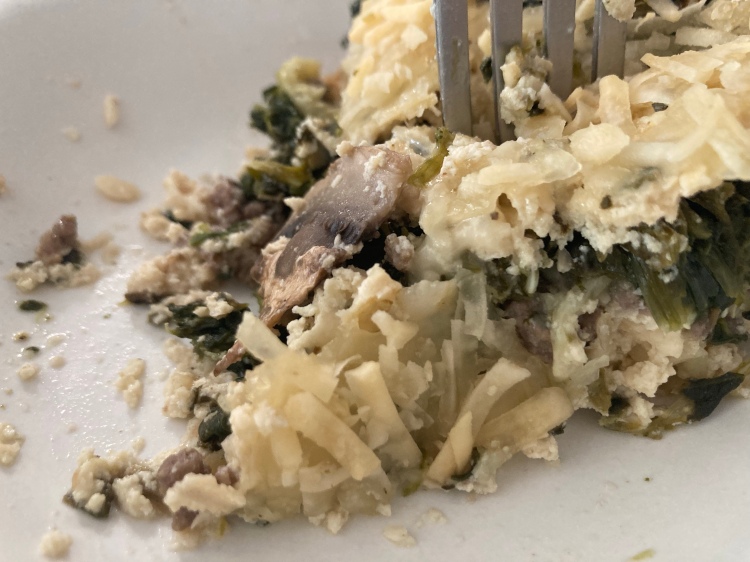
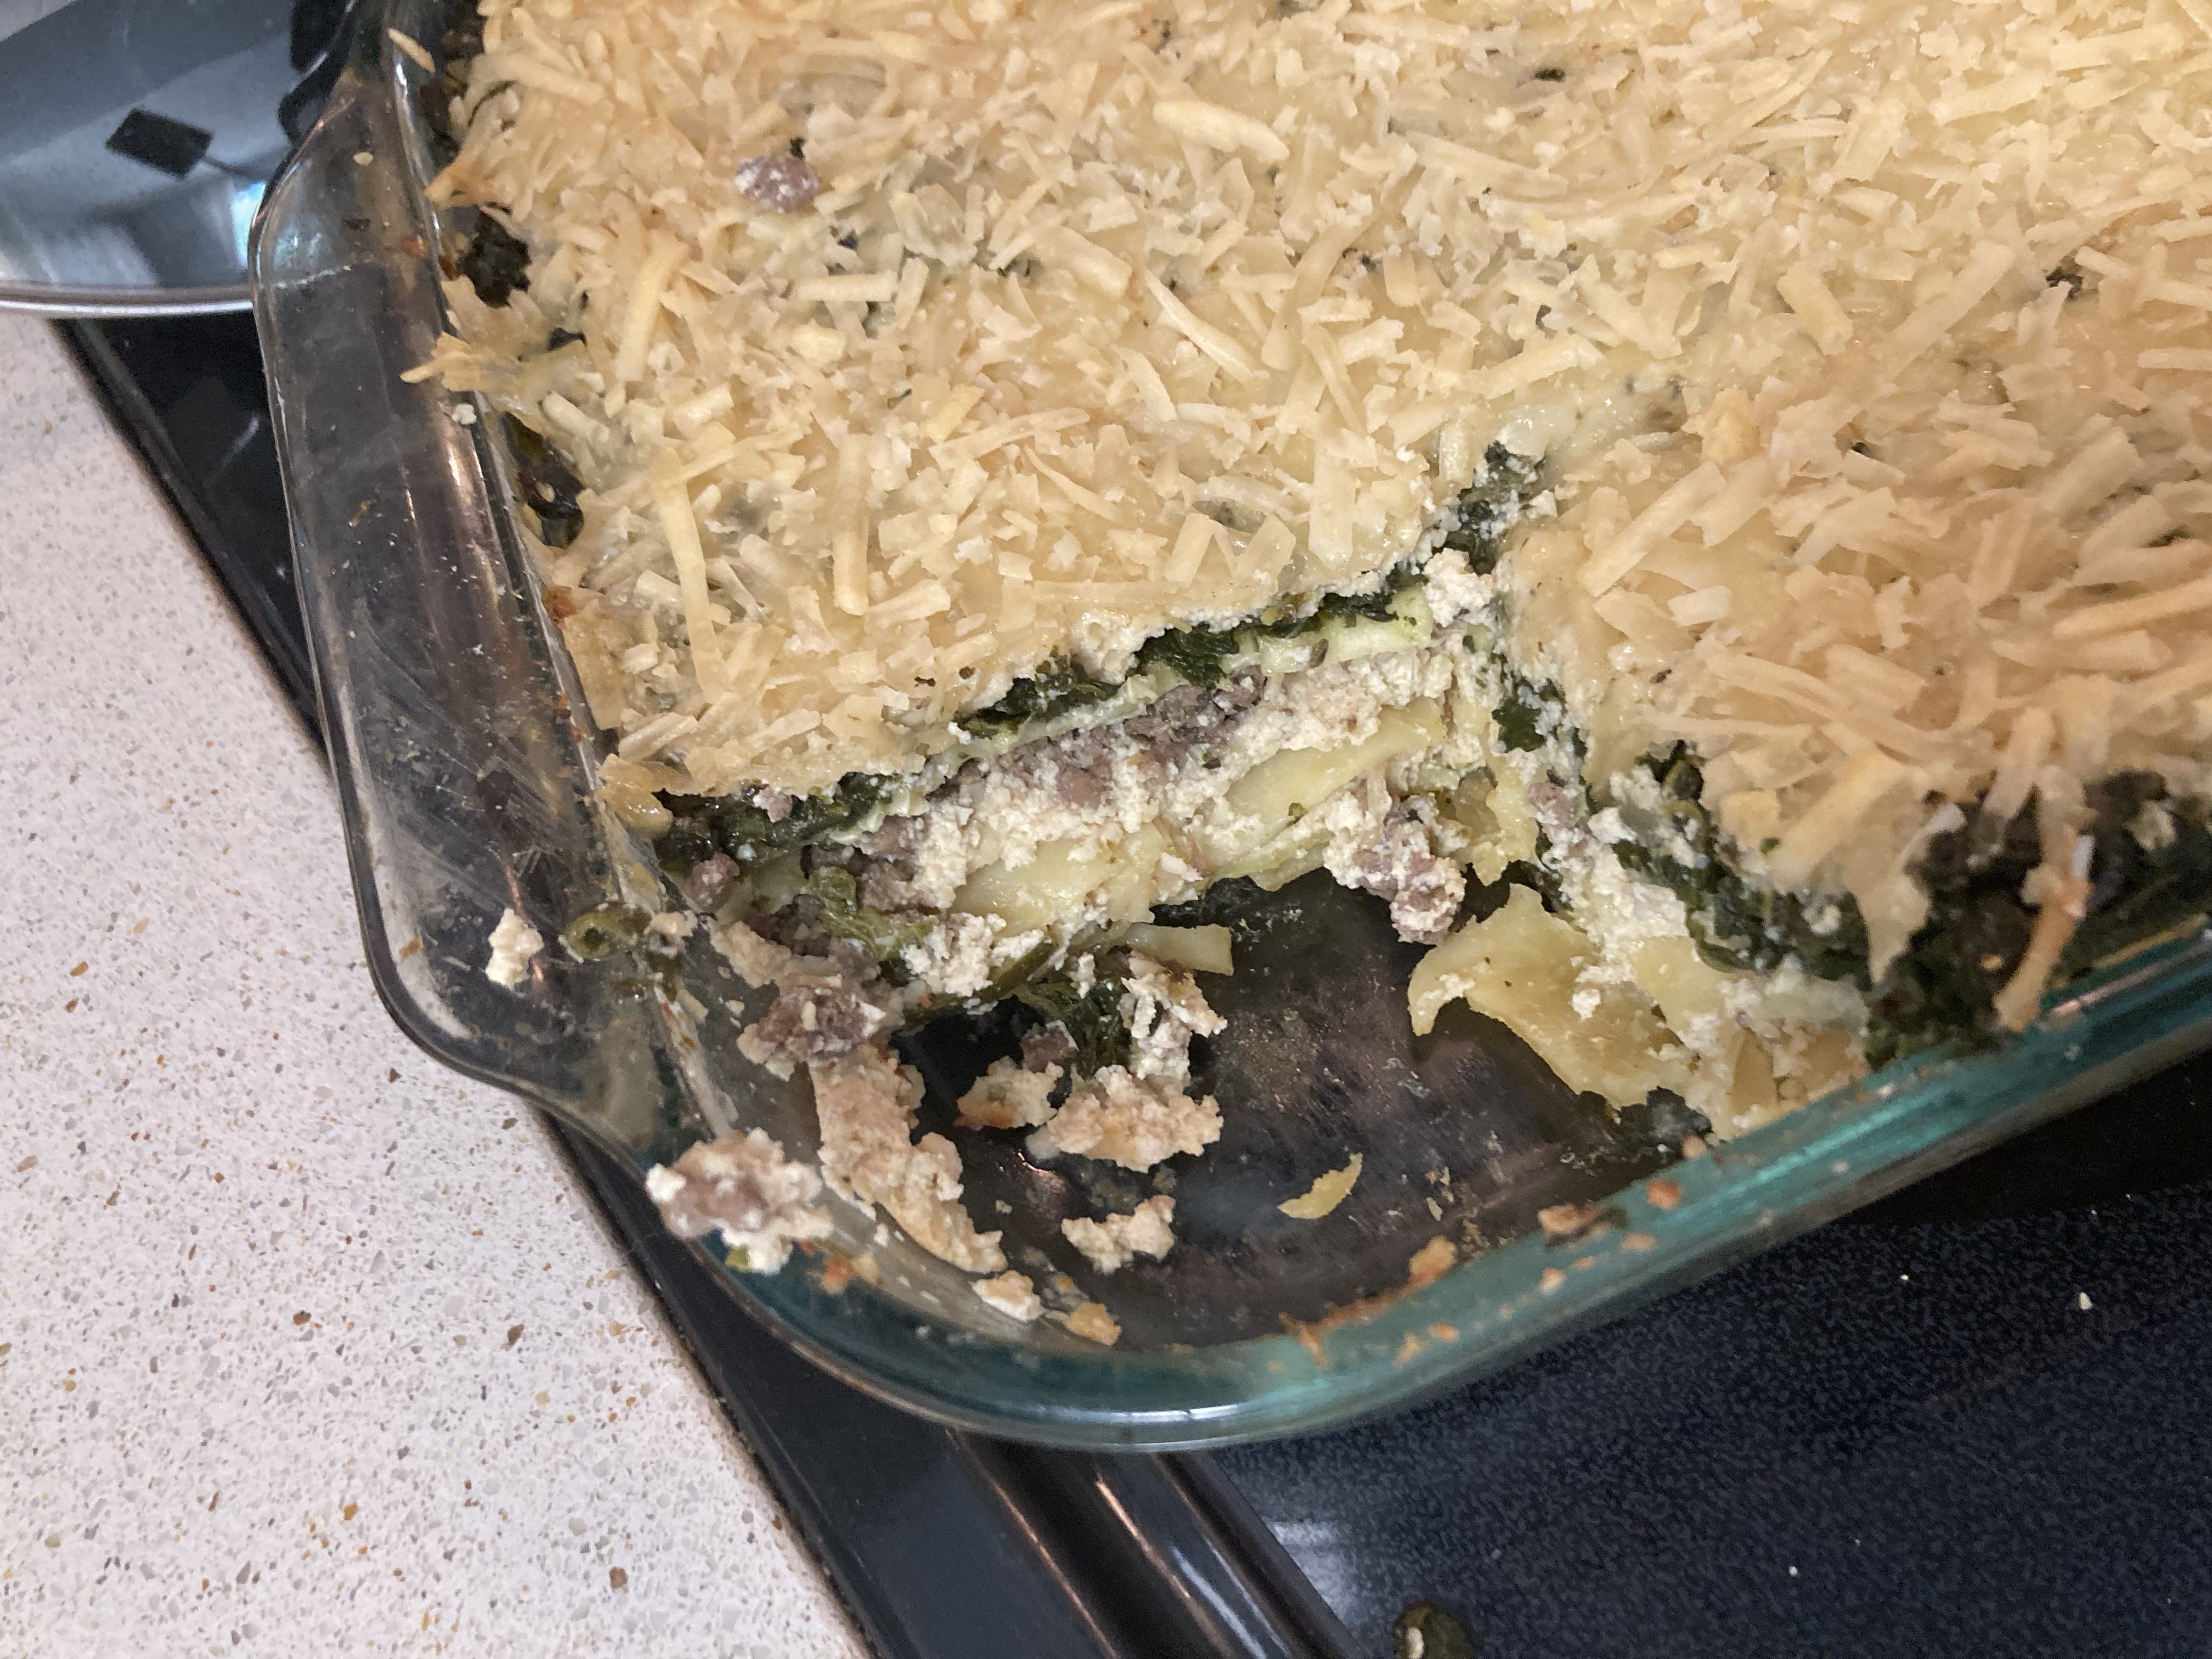
Here is a tasty veggie and meat lasagna without gluten, dairy, eggs, tomatoes, or sauce! I’m including lots of variations for those of you who have different specifications to meet. Please let me know if you give it a try!

Layers

For my veggie and meat lasagna, I am using a lot of raw veggies to add moisture. This is essential since I am skipping the sauce. However, you could pre-cook your veggies and use a sauce instead.

Veggies

For veggies, I use: zucchini, mushrooms, and frozen spinach. If you can tolerate it, sliced tomatoes are the missing flavor in this combo. Alternatively, you could use yellow squash or Mexican squash, skip the mushrooms, and do extra meat or cheese to make up for no spinach.

Meat

I like to use lean ground beef for my lasagna. You can use Italian sausage, ground pork, ground turkey or chicken, or skip the meat altogether. I always flavor my meat with Italian dry seasoning and fresh minced garlic while cooking. It’ll also need a fair amount of salt.

Cheese

My cheese is a tofu ricotta and store-bought vegan cheeses. This ricotta is THE BEST dairy free thing I make, so try it before you count it out. When baked into these layers, you can’t tell the difference. My cheese-loving husband’s words. I make a double batch for lasagna. Use a vegan mozzarella that you like. Since I’m leaving out sauce, I am also using vegan shredded parmesan for added flavor.

*If you can’t eat soy, you’re going to want to use extra shredded cheese or try a nut-based homemade cheese sauce. Alternatively, you could make an easy white sauce and add lots of vegan shredded cheese.

Noodles

My favorite gluten free vegan lasagna noodle is corn based. It just holds liquid better and reheats without going mushy. You can use a rice based noodle, but it may get mushy when reheating leftovers, so consider making a smaller batch. If you are able to use regular lasagna noodles, I recommend pre-cooking or soaking for 30min in cold water to make up for the lack of liquid in this recipe.

Sauce

This recipe has no sauce! Instead, we are using raw veggies and a little veggie or chicken stock. If you want to skip noodles altogether and use zucchini instead, you do not need broth either. If you like sauce, I’ll include a couple recipes for you below.

My grocery list:

  • 1lb lean ground beef (equals 1 thin layer)
  • 2 containers of extra firm organic tofu (ricotta)
  • 1c raw cashews (ricotta)
  • 2-3 lemons (ricotta)
  • 1/4c nutritional yeast (ricotta)
  • approx. 1/2c cashew milk or soy milk (may sub with any except coconut)(ricotta)
  • 1 box gluten free lasagna noodles (my favorite)
  • 3-4 medium zucchinis (or squash)
  • 1/2lb whole mushrooms (can sub canned)
  • 1/2-1lb frozen chopped spinach, thawed (1lb equals 1 thick layer)
  • vegan shredded cheese, mozzarella style
  • vegan shredded parmesan (for spinach)
  • salt, pepper, Italian seasoning, minced garlic, onion powder
  • 1c veggie broth or chick broth or water

Helpful to have:

  • large sharp knife for mushrooms
  • wooden spoon for meat
  • food processor for ricotta
  • mandolin slicer for zucchini
  • cutting board

Prep order:

  1. Chop veggies & thaw spinach. *Can be done ahead of time and stored in fridge.
  2. Make vegan ricotta. *Can be done days before.
  3. Cook noodles & meat (skip if using GF noodles). *You can pre-cook regular noodles and store them in the fridge. Same with the meat.
  4. Layer! Preheat oven while layering.
  5. Bake or freeze! *I have not tried freezing this raw.

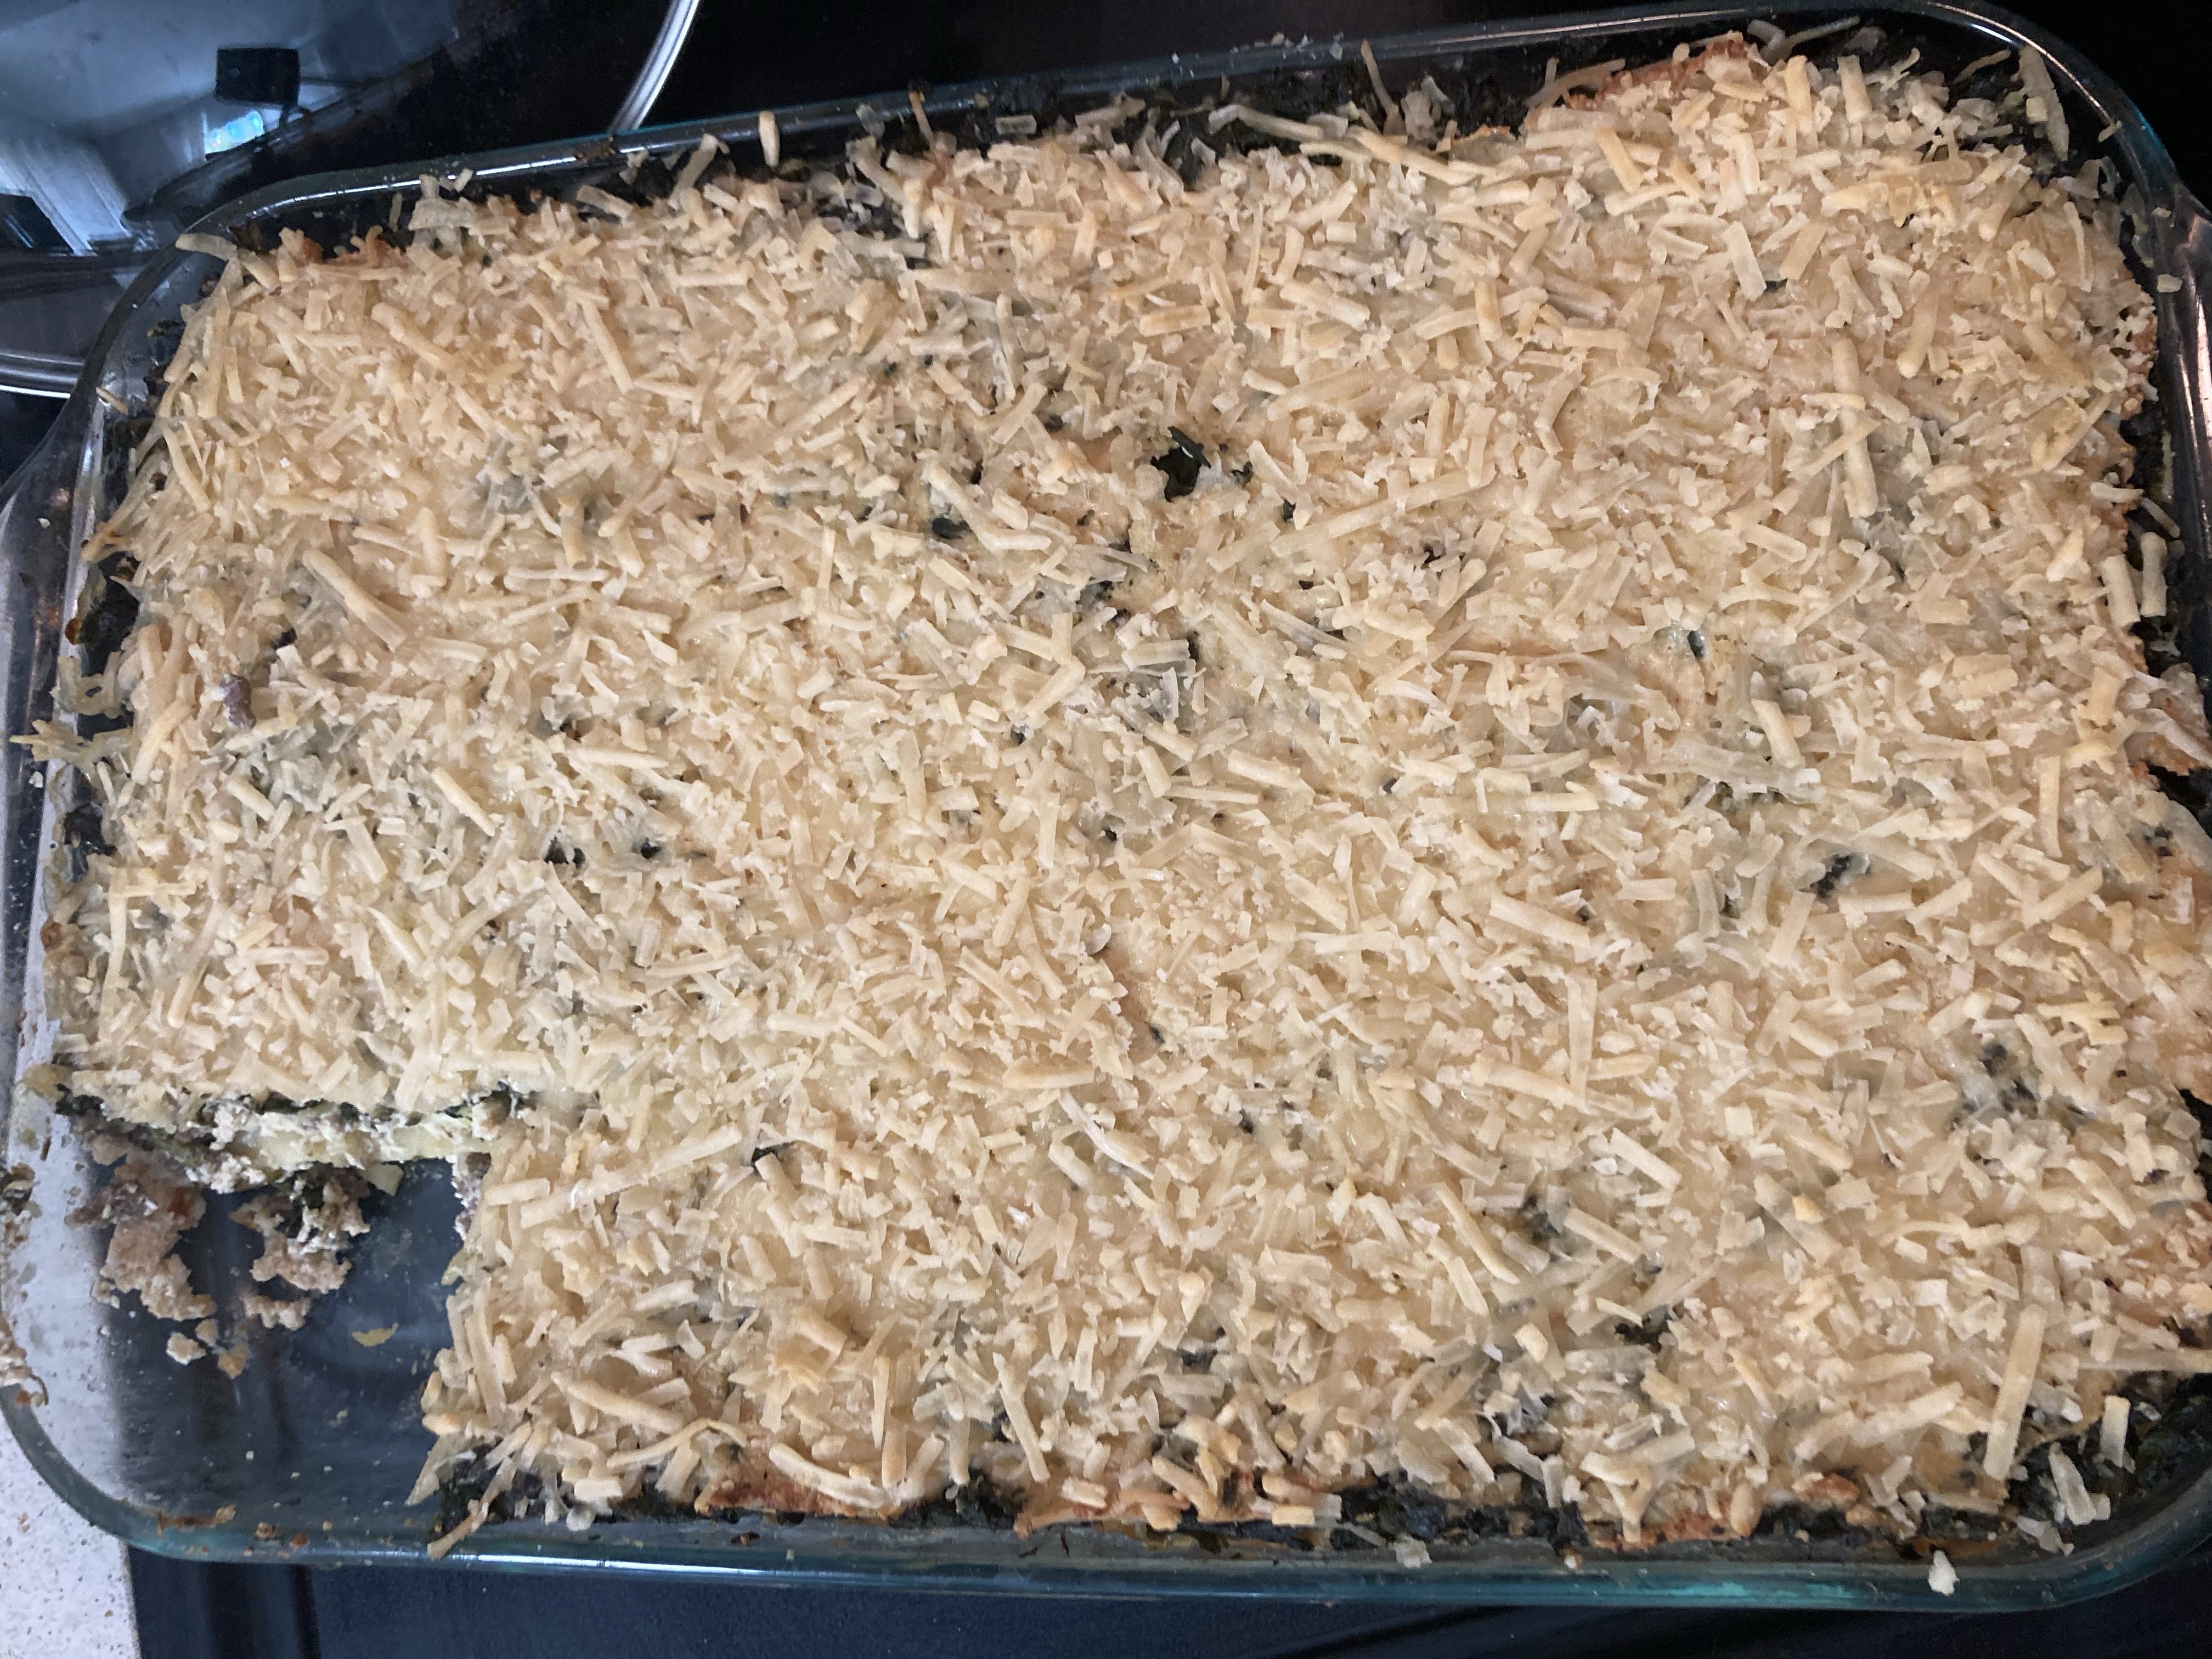
Bakes at 350 degrees Fahrenheit for 1 hour in 9″ X 13″ large glass casserole dish

  1. I make the ricotta first. You can use store-bought ricotta instead, about 16oz, and mix 2 eggs in if you can eat them. When I make the recipe from From My Bowl, I do not add any extra seasonings, but Italian seasoning would be a good add in.
  2. Cook the meat on medium in a large skillet. Add about 1 tsp of Italian seasoning, 2 tsp of minced garlic (2 cloves), and salt. Continue breaking it up as it cooks so you end up with very small pieces. You can add extra spices if you want to kick up the flavor. Cayenne or red pepper flakes would give you some spice.
  3. Cook your noodles if using the regular kind. Skip if gluten free or omitting.
  4. Wash your produce, then slice your mushrooms thinly. Use a mandoline for the zucchini if you have one. I used the 2nd thinnest setting. Make sure you cut the ends off and discard.
  5. Assembly! Start by adding around a cup of broth (or water or *sauce) to the bottom of your empty lasagna dish. You want it to be a few times thicker than your noodle width. This ensures the bottom layer of GF noodles get cooked.
  6. I add 6 noodles next. 4 standing up and 2 long-ways on the bottom to fill gaps. You can add more, less, or break them to fit better, just remember: the more noodles, the more liquid needed.
  7. Next, I add a layer of zucchini sliced thin long-ways to mimic noodles. Use the thinnest or 2nd thinnest setting on your mandolin. You can slice these by hand, but they will turn out thicker. Slice them like a cucumber for better control. (This takes longer to lay in the pan.) Lightly salt the top of the zucchini to help them release their water, and for flavor.
  8. Add a thick layer of *ricotta. (*I add the 1/2c of milk into the vegan ricotta for extra moisture when not using sauce.) From my double batch, I use about 40% to make this thick layer. You can add Italian seasoning on top if you want.
  9. Next, add the meat in a thin layer.
  10. More noodles.
  11. Ricotta again. 40%.
  12. For spinach, you can spread it out and then add the full container of parmesan (approx. 1/2c), salt, and pepper, or you can mix it all together in a bowl first. My layer was quite thick, so use less spinach if you don’t want it to dominate the flavors. Yes, you can use fresh spinach, but I can’t promise it will provide enough moisture or space for more layers. *A fun addition her could be some quartered artichoke hearts mixed in with the spinach.
  13. Add a final layer of zucchini. Lightly salt.
  14. Spread the remaining 20% of ricotta thinly over the top. Add a generous layer of mozzarella.
  15. Bake! Without a covering, I baked mine for 1 hour, or until the liquids are visibly bubbling. Your vegan cheese will likely not look melted. You can try broiling for 1-2min, but you may just get some harder cheese. This happened to me with one particular brand.

*If you are worried about moisture content, you can cover the lasagna with aluminum foil while it bakes. Feel free to mix up the layer order too!

Alternative Sauces

Red

Typically, you would use canned crushed tomatoes or a pasta marinara sauce in lasagna. You can buy low FODMAP sauce at some health food stores if you have a garlic or onion intolerance, or just used crushed tomatoes in your meat. About 28oz per lb of meat. Or skip the meat and just use the tomatoes/sauce.

Veggie

My favorite tomato-free lasagna sauce is a roasted red bell pepper sauce. I just use the sauce from this recipe. *Tip, blend this in a high speed blender, not a food processor. You probably do want to double this for lasagna.

White

Traditional white lasagna uses a béchamel sauce, which is a fancy way of saying milk sauce. You can research your own version, but for lasagna you are going to use something like this: 4c milk (sub DF), equal parts butter and flour (sub cornstarch, or other thickener but cut amount in 1/2) and some seasonings. You start by melting the butter (sub vegan butter), add the flour/starch, and cook until thick (1-2min), then slowly add the milk. Simmer and stir until thickened like a creamy sauce. Use salt, pepper, and even a pinch of nutmeg (best with dairy).

*Any of these sauces can be added on top of a noodle layer in the lasagna, or mixed together with the cooked meat. Always use a layer on the very bottom and very top, right before the mozzarella topping, to keep the lasagna moist.

Allergy Substitutions!

I’ve included quite a few in my recipe, but I want to cover all the bases.

You can leave out the cashews. This will effect the taste of the ricotta, but not the bell pepper sauce. You can use a little cornstarch to thicken the pepper sauce if you want, but it won’t matter once the lasagna is cooked.

If you have a lemon allergy, I have no idea what to sub for lemons in the ricotta. You could try a tiny bit of vinegar, but I think that would be too strong. Any ideas?

IF you do not want to use any veggies in this recipe, use more meat and more noodles. Your layers will be thinner, and that’s ok. Adding a sauce will help with this.

No meat: theoretically, you could use only GF noodles and vegan cheeses to create a thinly layered lasagna, but you’re going to lack moisture. Either use a sauce, or add extra veggie broth and DF milk, then bake covered with foil. There isn’t a neat protein substitute if you want to leave the meat out of my original recipe, but the soy-based ricotta will already have some protein.

Replace ALL the noodles with zucchini! I’ve done this many times before. Just make sure you slice it thin or you will not have room for very many layers. If you do this, you can actually skip adding broth to the bottom. If you use a sauce, try pre-cooking the zucchini without salt to lesson the residual moisture, otherwise you’ll have a soggy bottom when you cut into the lasagna, speaking from experience. Leaving the salt out helps the zucchini look less wilted.

Add ins and subs: peeled eggplant instead of squash, use a butternut or winter squash with just cheeses and meat, layer some sliced tomatoes or fresh basil, baby kale or other greens instead of/with spinach, sliced bell peppers, more cheeses! Any other suggestions?

I would love to try a Mediterranean inspired lasagna! I would use Mediterranean spices, ground turkey (subtle), feta, olives, artichokes, spinach, and a white or red sauce-or skip the sauce!

How do you make lasagna?

Featured

Vegan Ice Cream

Finally! I’m intolerant to coconut and pea protein, so there aren’t any store bought vegan gluten free ice creams that I’m able to eat. After long searching, I found a recipe that looked like it might be both possible and delicious.

It was a hit! Even my dairy-eating husband enjoyed it. You can also switch out the dairy free milks and type of nut butter according to dietary needs.

Thanks to Chocolate Covered Katie for sharing the base to this recipe!

While I’ve only tried this recipe once, I intend to attempt another variation soon and will update you with new flavors as I try them. Below is my variation for peanut butter chocolate swirl.

Serves 4-6, about 3 cups

Ingredients Base Recipe

  • 2 c. dairy free milk
  • 1/3 c. sugar
  • 1/2 c. nut butter (smooth)
  • optional pinch of salt
  • flavor of choice (1/8 tsp peppermint extract, 1/2 tsp vanilla, 1/4 c. cocoa powder etc.)

*Update: Mint chocolate chip came out quite a bit icier than PB. I also doubled the peppermint extract. Later, I made a cherry chocolate chip using 1/4 c of blended quick oats along with the flavoring and the consistency was better. The main idea, try to add some flavoring with physical consistency to keep the ice cream from getting too hard and icy.

Peanut Butter Chocolate Swirl

Makes about 3 cups, 30 min + 2-4 hours to freeze

  • 2 c. oat milk (cashew and almond are good alternatives)
  • 1/3 + 2 tablespoons c. white sugar (nearly 1/2 c.)
  • 1/2 + 2 tablespoons creamy peanut butter* (10 tablespoons)
  • 1/2 c. semi-sweet or dark chocolate chips
  • Microwave, blender, ice cream maker
  1. Place milk, sugar, and peanut butter into a food processor or blender and puree until thoroughly mixed. Since we used peanut butter, there is no need to add extra salt. *It is important here to use creamy peanut butter if you do not want chunks in your ice cream. Also, make sure to reduce the sugar if you use sweetened peanut butter. I used unsweetened, unsalted PB. I do NOT recommend using PB powder because the fat content is an essential ingredient for creamy ice cream. Cutting it out will leave you with ice or sorbet instead.
  2. Pour straight into ice cream maker and turn on. Churn for 20 minutes.
  3. When the ice cream is almost done, melt your chocolate chips in 30 sec intervals in the microwave, or in a bowl over boiling water. Mix until smooth. If it’s hard to stir, add a tiny bit of dairy free milk.
  4. When the ice cream has about 1 minute left to church, quickly pour the chocolate straight into the middle, allowing it to swirl until you’re happy with it. Alternatively, you could hand mix for a more attractive pattern. You could also add the chocolate a few minutes earlier to fully incorporate it. (If you want chocolate chips instead, I recommend chopping or blending them into shavings before adding them or they will be hard to bite when frozen.)
  5. Turn off the ice cream maker. Scrape the edges and scoop ice cream into a freezer safe container. Or split it into portion sized containers for quicker freezing. It will take 2-4 hours for the ice cream to fully harden. Feel free to eat it as soon as it reaches your desired texture!

If you do not have an ice cream maker, Chocolate Covered Katie suggests pouring the mix into an ice cube tray and blending once frozen. You’ll need a sturdy high powered blender for that, and expect the texture to be a little different.

If you want to try making ice cream with ice and special salt in a plastic bag, let me know how that goes! I’ve always wanted to try it.

Almost done churning!
Fully frozen-might thaw a bit!
Delicious!

Featured

Grandma’s Banana Bread (GF/V option)

I’m going to share my family’s special secret recipe for banana bread! It’s the go-to for my grandma, my mom, and now me. I’ll include the original, which I bake for my husband, and the allergy-friendly modifications I make for myself will be located below. Feel free to switch out the flours for others like almond, but know that coconut will significantly effect the texture. Only use 1/3 of what you normally would.

Makes 1 bread-pan loaf in 60 minutes at 350 degrees Fahrenheit

GF, V version

Ingredients

  • 2 c. flour
  • 1/2 c. butter or vegetable shortening (I use Crisco)
  • 1 c. sugar (I cut it in half for myself to get a muffin-like texture)
  • 2 eggs (Bob’s Egg Replacer or flax eggs)
  • 1/4 c. buttermilk (add 1 t white vinegar or ACV to dairy free milk)
  • 3 mashed overripe bananas
  • 1/2 t baking soda
  • pinch of salt
  • 1 t cinnamon*
  • 1/2 t nutmeg*
  • 2 mixing bowls
  • bread pan

Perfect GF/V Version

  • 1 c. oat flour (make yourself by blending quick oats* dry)
  • 1 c. buckwheat flour
  • 1/2 c. Crisco (sub half for applesauce for less fat*)
  • 1/3 c. light brown sugar (sub for any kind dry)
  • 1/2 c. white sugar (sub for any kind dry)
  • 2 T Bob’s egg replacer or another egg replacer
  • 1/2 c. DF milk + 1 T AC/white vinegar (this includes 1/4 c. liquid for the egg substitute)
  • 4 mashed overripe bananas (3 is okay too)
  • 1/2 t baking soda
  • pinch salt
  • 1/2 T cinnamon
  • 1 t nutmeg
  • pinch allspice
  • Crisco & flour to coat pan
  1. Beat sugar into the butter or shortening with a hand mixer or standing mixer until creamy. About 1 min. You can use half brown sugar here, but don’t substitute a liquid or it will alter the consistency.
  2. Add eggs OR if making DF/V version, combine the remaining wet ingredients separately. You will need to mash the bananas on their own first using a fork or masher.
  3. Add the buttermilk OR your bowl of wet ingredients*.
  4. Separately, combine all dry ingredients with a whisk.
  5. Now, add the dry ingredients to the wet and mix just until combined.
  6. Turn on your oven to 350, then prepare your bread pan. (I coat mine in Crisco and flour.)
  7. Pour into a bread pan and bake for 60 minutes or longer, until top is golden and a knife or toothpick comes out of the center clean. You can make muffins instead, but they will be done quicker and I have not timed them. Let me know if you try it!
  8. Remove from pan and allow to cool. Once cooled, keep in the fridge (I use a plastic bag).

*I make oat flour by putting GF quick oats in a high-speed blender until it reaches the texture I want. I use the same amount of oats that I want to end up with once it’s flour.

*You CAN use vegetable shortening or coconut oil instead. Reduce the amount by 3/4 (2 T less) for vegetable oil and use the same amount for coconut. Do not use olive oil. It doesn’t taste good here. Treat avocado oil like vegetable oil.

*The spices here are optional. My mom was the first to add them, and I add even more. Spice to your taste. Cardamom may make a great addition, or leave them all out and add chocolate chips!

*Wet ingredients can be confusing when using egg substitutes, so here’s what I do. I have found that pre-mixing flax eggs and substitutes like Bob’s verses adding them to my dry mixture and using extra liquid to compensate both create the same end results. Do whatever you are comfortable with, just be careful to keep track of how much moisture you are adding so you don’t adjust the consistency.

A few minutes in
Cooling
Best served chilled with butter!

Featured

Spiced Acorn Squash Muffins

These are my new favorite muffins!

I started with a recipe I found online and added lots of extra spices and some allergy friendly modifications. You could use butternut squash too, but I like the nuttiness of acorn squash. This is also a great way to use pumpkin puree!

These are not too sweet, so you can feel free to add in some more sugar if you prefer. If you use a dry sugar, like brown sugar, add a little extra milk to compensate.

Makes 1 dozen

325 degrees for 25 minutes

  • Dry:
  • 1 cup of oat flour or quick oats
  • 1/2 cup buckwheat or gluten free flour
  • 1/4 tsp salt
  • 1/2 tsp baking soda
  • 1 tsp ginger (ground/powdered)
  • 1 TBSP cinnamon
  • 1/2 tsp allspice
  • 1/2 tsp cardamon (ground)
  • 1/2 tsp nutmeg
  • Wet:
  • 1 cup of pureed acorn squash**
  • 1/4 cup maple syrup, honey, OR agave
  • 1/4 cup vegetable or coconut oil*
  • 1/4 cup applesauce *
  • 1 egg substitute (flax eggs work great here)
  • 3 TBSP milk (cashew is my favorite for baking, but you can use water in a pinch)
  • 1 TBSP vinegar
  • 1 tsp vanilla
  1. First, if you aren’t using cupcake liners: grease a muffin tin using vegetable shortening (oil or butter can work too) and buckwheat flour. I use a paper towel to spread the crisco, then sprinkle the flour on top, shaking it to spread it out. Dump out access flour. Then preheat the oven to 325 degrees Fahrenheit.
  2. Mix the vinegar and milk, if using. If you pureed the milk in with the acorn squash, just combine all the wet ingredients together very well.
  3. Mix the oil and applesauce well. Add the rest of the wet ingredients.
  4. In a separate bowl, combine all dry ingredients. Feel free to leave out spices if you don’t have all of these. Cinnamon is the essential spice here, and nutmeg goes a long way, but don’t skip the salt-it helps bring out the sweetness.
  5. Add the wet ingredients to dry and stir until combine. Pour directly into greased or lined muffin tin.
  6. Bake in the center of the middle rack for about 20 minutes, or until a knife or toothpick inserted into the center comes out clean. These will be darker because of the buckwheat, so keep them in when in doubt unless they start to brown.
  7. Store in the fridge once cooled.

The key with muffins (and pancakes) is always not to over-mix, but these muffins are quite forgiving. You could put all the ingredients in one bowl and they would come out okay, but I won’t vouch for them myself.

**I bake my acorn squash in halves wrapped in tin foil at 425 degrees Farenheit for 50-60 minutes, depending on size, turning them halfway through. Scoop out the baked squash and use it directly in the muffin mix OR puree first with the required milk to get a creamier texture.

*I cut the oil here with applesauce to reduce fat and give these muffins a lighter texture. You can, alternatively, use all oil or all applesauce. Oil will produce heavier muffins and applesauce will make them more cakey. I do not recommend using olive oil since it is heavy and stronger in flavor.

I like the texture here, but instead of oats, you could use all buckwheat, (1/3 c.) coconut flour, almond flour, or another nut flour. I usually blend my quick oats in a high speed blender to make a course flour, but you can leave them whole for more texture-just be sure to use the quick cooking kind.

If you try these with a gluten free flour blend, let me know how it goes!

I topped my muffins with crushed walnuts-totally optional! But you can add toppings like this before they go into the oven to make sure they stick.

Butternut Squash Soup

This is my favorite butternut squash soup. Since fall is around the corner, will you join my in giving it a try?

I’ve tried this with onion, but I like the taste of leeks much better. It compliments the sweetness of the squash.

Serves 6-8 (makes about 8 cups)

Ingredients

  • 1 large butternut squash
  • 1 large leek
  • 4 cups veggie broth (sub for chicken)
  • 1/4 tsp nutmeg, coriander, paprika, salt
  • 1/2 tsp pepper, onion powder, ground sage
  • Maple syrup to taste (approx. 1 T)
  • Hand blender, food processor, or blender

Directions

  1. Wash the squash, then cut it in half length-wise. Coat the skin with a little oil, scoop out the seeds (save for a roasted snack if you want!), and cover in foil.
  2. Bake the squash halves at 350 degrees Fahrenheit for about 75 minutes. You could also bake it at 400 for 40 minutes, turning halfway, but watch for burning.
  3. While the squash is baking, finely chop the white part of the leek and add it to a large deep skillet on medium heat with a tiny bit of oil or butter. Sprinkle the salt and spices on top after about 2 minutes (not the maple). Sautee’ for a few minutes, until the leek begins to soften and the spices are aromatic, stirring a few times. About 3-5 minutes. Remove from heat and pour into blender or food processor. (Skip if using hand blender.)
  4. Once the squash is soft to the touch, you will scoop the flesh out of the peel straight into a blender or food processor. (If using hand blender, scoop directly into pan.)
  5. Add the 4 cups of veggie broth and puree. A food processor will not puree the leeks as finely as a blender, so you may want to strain if you like it smooth.
  6. Taste test and adjust spices and maple syrup as needed. That’s it!

Tips:

I have tried this with chicken broth and it comes through too strongly, in my opinion. However, it works in a pinch. You could also sub the broth for your choice of unsweetened milk, but I have not subbed the full amount, so I cannot vouch for the flavor. You will want more spices if you do so, since milk is fatty. (Only if using dairy milk.)

I do not put garlic in this soup because it turns the soup bitter. This soup is best if it keeps it’s mild sweetness.

I serve this soup hot, but unless you are using chicken broth (too fatty), you could serve it cold as well.

Try adding: Carrots! They would pair well. You can also reduce the broth and add thyme for a pasta sauce.

Share your pictures if you give it a try!

Cheesecake (family recipe!)

This is the only cheesecake recipe I’ve ever used, because it’s just about perfect. While I can’t eat it anymore, I’m excited to share it with you!

You’ll either want to use a springform pan, two store bought crusts, or cut the recipe in half.

Best made the day or morning before to allow for chilling. Do not eat it hot.

Ingredients

Graham Cracker Crust: (skip if using store bought)

  • 1 1/2 c. graham cracker crumbs
  • 1/3 c. melted butter
  • 3 T sugar (white granulated is best)

Filling:

  • 4 eggs (aqua fava may work as a substitute but I haven’t tried it)
  • 4 packages of 8 oz. cream cheese (or low fat)
  • 1/2 c. white sugar
  • 1/2 c. light brown sugar
  • 1 tsp vanilla
  • splash of fresh lemon juice (bottled works too)
  • Hand mixer or standing mixture
  1. Put a few graham crackers into a large ziplock bag and press it flat, seal. Now, either take a rolling pin and smash them or use another heavy object like a can or glass cup. Smash finely until you have enough crumbs. Repeat if necessary.
  2. Measure out 1 1/2 c. crumbs and combine melted butter and sugar. Mix thoroughly. Check the consistency by squeezing some in your hands. It should hold together lightly without any butter squishing out.
  3. Press the crust mixture into the bottom of your pan, and up the sides if you want. This fits best into a springform pan. You will not be able to keep the crust going all the way up the sides. If you have a trick for that, share it below!
  4. For the filling: Start by blending the sugar and the cream cheese until smooth. You may want to leave the cream cheese out to soften for an hour or so first. If you add all the ingredients at once, you will get lumps! Take my word for it.
  5. Next, add each egg one at a time and blend until smooth. (A good tip is to crack it into a measuring cup first to make sure no shell pieces end up in your food.)
  6. Lastly, add the vanilla and lemon juice. We use around a tablespoon of juice, but I’ve never actually measured. Just taste it and add more if needed. Don’t overdo it! I’ve mostly used the bottled kind, so don’t feel bad if its all you have. It works. (The lemon brings out the sweetness and sharpens the cheese at the same time. It’s our family secret!)
  7. Pour the filling into your pan, pre-baking optional. Bake on middle rack for 55 minutes at 325 degrees Fahrenheit. I recommend placing a pan underneath to catch any leaks and for easy removal. It is done when the top has just begin to golden and the middle loses its jiggle. It will continue to firm up when refrigerated. Cracks may happen; I don’t have a trick for that yet.
  8. Leave out to cool for an hour or so and then refrigerate for 4 hours, or until completely chilled. Then its safe to top with chocolate sauce, fresh strawberries, or whipped cream! We like it so much, we always eat it as is.

Variations: If you want a chocolate crust, add a couple tablespoons of cocoa powder (to taste) and an extra tablespoon of sugar, increasing butter as needed for texture. You can also add chocolate chips in after pour half of the batter, or top it before baking. Bear in mind that adding chocolate chips to the top may cause burning because of the high sugar content. Cover with foil to prevent this.

Crumble (GF, V)

My favorite go-to dessert is a fruit crumble recipe that I actually made last night. Since my husband’s favorite dessert is berry pie, I like to make this when I don’t have a crust.

I adapted this recipe from a cooking book I found at the library. After researching, I’ve found many variations online. I’ll provide some variations of my own, but feel free to experiment. This recipe is very forgiving!

Serves 10 ish after baking 45min at 375 degrees farenheit

Ingredients

Fruit:

  • 4 fresh plums
  • 2 fresh pears (I like bosc)
  • 1 1/2 c. berries (fresh or thawed from frozen)
  • 1/2 c. chopped dried apricots soaked in hot water OR fresh
  • OR use 5 c. of any frozen berry combination, thawed

Filling mix:

  • 1/4 light brown sugar
  • 2 T buckwheat flour
  • 1 1/2 T starch
  • 1/2 tsp cinnamon, 1/4 tsp allspice, or to taste
  • pinch salt

Topping:

  • 1 1/2 c. GF old fashioned oats
  • 1/2 c. buckwheat flour
  • 1/3 c. oil (coconut is best)
  • 1/4 c. light brown sugar
  • cinnamon to taste
  • pinch salt
  1. Chop or thaw fruit to size of preference, keeping the size even. I usually cut frozen strawberries in quarters when I use a berry blend. Be sure to use a bowl to thaw the berries. (If you don’t have time, you can skip thawing and add 10-15 min. to baking time.)
  2. Add filling mix to the fruit and combine thoroughly. You can use cornstarch, tapioca, potato starch, or arrowroot powder as a starch. Or INSTEAD of adding a starch, use a glutinous flour. The starch is meant to make up for the lack of gluten.*
  3. In a separate bowl, mix the topping. You will need to melt the coconut oil ahead of time if using. You can also use honey as your sweetener. If you substitute more than half the sugar for honey, subtract a little oil. You want the texture to be like gritty granola, not flour (too dry) and not cookie dough (too wet).
  4. Pour the fruit mix straight into a glass baking dish leaving at least half an inch of space at the top. I use a casserole dish and sometimes pour the fruit in before mixing everything else just to check for size. This is because I don’t usually measure the fruit… I like to bake like an artist with a paint brush.
  5. Sprinkle the topping over the top evenly. If you like a thicker topping, you may want to double the recipe. I find that the mixture incorporated into the fruit makes up for the thinner topping, but I do occasionally sprinkle more oats on top at the end.
  6. Bake uncovered on the middle rack for 45 min at 375 degrees Fahrenheit. Add 10 minutes if your fruit is frozen. It’s done when you see the edges bubbling slowly. Allow to cool for a few minutes before serving. Tastes great with ice cream! Though, I eat the leftovers cold for breakfast…
  7. Store covered in the fridge.

*I have NOT made this with dairy or gluten, but you can certainly use butter instead of oil and regular or wheat flour instead of buckwheat, which is gluten free. I would recommend using less flour, up to one half, if you use regular flour, and be sure to cut out the starch.

Substitutes:

You CAN use any dry sugar in this, including dark brown or coconut sugar. Keep in mind that this will alter the flavor. I would NOT use a liquid sweetener for the fruit mix since it has its own liquids, but you can use liquid sweeteners for the topping.

You CAN use vegetable oil, ghee, or any type of butter for the topping. I would NOT use olive oil. It has too strong of a flavor and will add an odd aftertaste.

You CAN use any type of uncooked oats, but be sure to use gluten free if you need to since most oats are coated in flour to keep them from sticking. My preference is old fashioned, but you can use quick oats in the same proportions.

You CAN use any type of stone fruit, like berries, apples, plums, or pears. Do NOT use citrus or tropical fruits. It won’t taste good or bake well. I like to use all apples and make this instead of apple pie!

Cornstarch, Tapioca, Arrowroot…What’s the difference?

Living gluten and dairy free, I end up using a lot of creative substitutes to get the consistency I need in recipes. Starch is fantastic binder that can create a gluten-like texture or thicken a sauce. As I’m perusing new ideas, I often see recipes call for the one binder I’m currently out of or have never tried.

I’m writing what I’ve learned about each so we can all decide which starch best works in our recipe.

Please feel free to comment with your own insights too!

Cornstarch

This is the most common starch to see in both baking and cooking recipes. It’s cheap and flavorless-unless you use way too much, While most of these starches won’t alter your flavor, cornstarch provides a thick consistency without looking like jell-o or slime. This is not true for starches like tapioca and arrowroot. If you want a flour or egg yolk substitute, this is closest.

For a time, my husband was avoiding corn. That’s why I first began to experiment with cornstarch substitutions. So if you need to avoid corn, don’t despair. You have other options! Check out the ideas below.

Tapioca

Tapioca is very similar to cornstarch in how it binds, but the end product is much more viscus. I would not use tapioca for gravy or pudding. It will turn out very much like mucus.

Tapioca is best for sustaining the moisture in GF breads and cakes. It simultaneously binds, like gluten, and holds moisture. You only need a little, so be careful. I once added too much to some brownies and got a consistency that puts me at a loss for words.

What you need to know is that tapioca starch is the same thing boba and tapioca (in pudding) are made of. Consider that before subbing it into liquid recipes.

Potato starch

Potato starch is what I use when I need binding without the gooey result tapioca starch gets me. However, potato starch does not bind as well as the other starches, so I do not use it in place of egg yolks or eggs.

This is why I typically use potato starch in conjunction with another starch in baked goods and also avoid using it in liquids for thickening.

Arrowroot

I use arrowroot less often because it is more expensive than cornstarch and potato starch. It does, however, gel up very similar to eggs in a pudding (the American kind). And a little goes a long way.

Use arrowroot for powerful binding power, but avoid using too much or your product will feel like flan.

Agar agar

This one fascinates me, but I’ve yet to try it myself. This is because I have not found it in a local store and refuse to pay for the shipping. However, one day, I shall overcome that stubbornness so I can try making the famous rain drop cake I’ve heard of using solely agar agar, sugar, and water. It looks like a giant drop of rain!

Agar agar is more expensive, completely clear, and firms up similar to jell-o with more wetness and give. The best substitute if you don’t have any on hand either would be arrowroot, then cornstarch for a cheaper option. Keep in mind that cornstarch is somewhat opaque and agar agar is clear.

Xanthan gum

While not a starch, you can use xanthan gum to bind gluten free flours like rice or buckwheat. Similarly, I use a mix of tapioca and potato when I don’t have xanthan gum since those are easier to find.

I don’t recommend it for hot liquids like sauce, mostly because I’ve never read it in a recipe to date. This is best used in making your own GF flour blend. A little also goes a long way.

Psyllium husk

Like xanthan gum, this is not a starch. It is a powerful binder that also works as an egg replacement. I would not add it directly to a GF flour blend, but you can use it when making certain GF breads, especially flat breads in a pan.

Psyllium husk often gives off an odd after-taste. Some people off-set this by adding a little apple cider vinegar to their recipe when baking.

Since psyllium binds like a gel, very similarly to a flax egg, I would not use it in sauces either. It will become gritty and chunky in a pudding since it gels immediately when mixed with water, not to mention the unappealing flavor for a dessert.

The take away: other starches need to be heated to thicken; psyllium does not, even though it is not a starch.

Flour

I want to mention flour even though it isn’t a starch per say, because it does thicken sauces quite well. Flour is often used to soak up extra liquid in apple pie and to make gravy.

You cannot substitute GF flour for the same effect, sadly.

Here are a few ways flour and starches are and ARE NOT interchangeable:

If you have flour on hand for meats, sauces, pies and gravy, use it. If you don’t, easily substitute cornstarch. You can also use tapioca and potato starch for more dry recipes with a similar result. I coat homemade french fries in tapioca starch (just a little) as I season them to keep them from sticking to the pan. Potato starch works too, but it does feel slightly powdery and tapioca does not. Many restaurants simply use flour.

I would NOT use flour to make lemon filling for pie. You need a starch like one mentioned previously. A smooth, clear one. But you can use flour in creamy custards and fillings, just keep it white and not whole wheat unless its a savory dish.

Examples:

Here’s how I use each starch in my own recipes. Mostly, I learn through experimenting, so I encourage you to do the same!

Lemon pie filling-cornstarch or egg yolk (no egg substitutes seem to work well here)

Vanilla or chocolate pudding (stovetop)-flour, cornstarch, or eggs

Apple pie-flour or cornstarch, tapioca is my favorite for berry pie

French fries or sweet potato fries-tapioca or cornstarch, potato starch in a pinch

Gravy-cornstarch or potato starch, flour (never tapioca…never again)

Sauce-mushroom and cheesy sauces usually require flour so I use cornstarch or tapioca, arrowroot would work

GF flour-blend of tapioca, potato, cornstarch, or xanthan, tapioca if I’m out of the others, cornstarch if its cookies

Brownies-same as GF flour blend

Gluten Free Flour Tutorial

Making your own gluten free flour is easier than it sounds. Here’s a list of the one’s I’ve personally tried along with my own tips for use or substituting when you don’t have the right kind on hand.

To preface, I do tend to buy a lot of bulk grains from the store. I fill re-purposed jars with millet, amaranth, and buckwheat, so I always have something on hand when I’m ready to bake. I’ll cover as many as I can, and hopefully one of these will be convenient for you too.

Oat Flour

  • Certified gluten free quick oats (most oats are lightly coated in wheat flour!)(dry)
  • Food processor OR high-speed blender
  1. Measure and blend until they reach the consistency you want. That’s it!
  2. Store in a sealed container in the pantry.

Uses: Great for muffins and breads. Easy to blend with other flours, especially buckwheat.

Not ideal for pancakes. Not recommended for cakes.

*Old Fashioned oats are a substitute, but will come out grittier.

Millet Flour

  • whole uncooked millet
  • High-speed blender
  1. Measure and blend until they reach the consistency you want. A food processor will not work here. My food processor did a great job of mixing, but the blades were too large to actually break down the millet. I switched to a high speed blender and that worked perfectly.
  2. When blending smaller amounts, make sure your container is proportionate, or the millet will rise into empty space and avoid blending.
  3. Store in a sealed container in the pantry.

Uses: Ideal for bread or muffins, even pancakes. Also blends well with amaranth.

Not recommended for cakes.

Amaranth Flour

  • uncooked amaranth (technically a seed!)
  • high speed blender
  1. Measure and blend until they reach the consistency you want. That’s it!
  2. Store in a sealed container in the pantry.

Uses: Since it has a slightly crunchy texture, ideal for pan-cooked flatbreads or combining with other flours to use in bread.

Not recommended for cakes.

Quinoa Flour

  • Uncooked quinoa (any color)
  • High speed blender
  1. While I have not personally blended quinoa, the process is the same as millet and amaranth. You need smaller blades to cut the tiny grains.
  2. Store in a closed container in the pantry.

Uses: Honestly, I’m not a big fan of quinoa flour. It tends to leave a strong after-taste. You could use it like amaranth, but I would recommend making sure your recipe has a strong enough flavor on it’s own to cover the quinoa.

Not recommended for cakes. (Noticing a pattern?)

Buckwheat Flour

  • uncooked roasted buckwheat (kasha)
  • High speed blender
  1. I don’t make my own buckwheat flour because I can buy it in bulk at Winco. However, the process would be the same as with the small grains above. The advantage here is that buckwheat is flakier and softer, so it will break down more easily.
  2. Store in closed container in the pantry.

Uses: Ideal for muffins, breads, pancakes, brownies. Buckwheat looks like whole wheat but has a much subtler flavor, so it won’t ruin your desserts. It also has a flaky texture, so it’s easy to substitute 1:1 for other GF flours. However, I recommend blending it with other flour for light flavors and chocolate, otherwise you’ll have a funny background taste. Banana bread has spices to cover this up.

I haven’t tried it in a cake, but of the above, this would be my first choice. Chocolate is probably safe, but not lemon or vanilla. You would want to use a starch to create a cakey texture.

Rice Flour

  • uncooked white or brown rice
  • high speed blender
  1. Even though rice breaks down very finely, it’s quite tough to begin with. This is why I recommend a really high quality high speed blender, or else you will need to strain your flour. This is why I haven’t done it! My blender is from college.
  2. Once you reach the texture you want, store it in a closed container in the pantry.

Uses: rice flour is the best for cakes and delicate baked goods. It is also easy to blend with other flours. I don’t recommend using it on it’s own, however, since it is slightly gritty. Add a tiny amount of a starch like tapioca or mix with other flours. You won’t be able to taste the rice once it’s cooked, so it won’t clash.

Best GF flour for cakes! Use white rice for cake and pastries.

Starch

It’s important to note that gluten is the starchy shell of many grains. Removing it also gets rid of the elastic property that both makes bread chewy and keeps cake moist. You will need to add a starch (corn, tapioca, potato, arrowroot) or gum (xanthan gum or psyllium husk) to compensate. For any given baking recipe, I usually add 1-2 teaspoons. Any more, and your end result will be gummy.

Read my post about about starches here.

Mug Brownie

When I’m craving chocolate desserts late at night, this is one of my favorites. I’ve also reduced the sugar so you don’t have to feel too bad about cake before bed. In fact, you an add some sugar and decide to feel good about that too!

I use gluten free flour, but you could use slightly less of regular flour and it will work the same.

Ingredients

  • 4 tsp coco powder
  • 4-5 tsp sugar of choice (I used white)
  • 1/4 tsp baking soda (still not convinced its essential)
  • 4 tsp butter or oil (coconut or vegetable)
  • 4 tsp milk or water
  • 7 tsp (2 TBSP + 1 tsp) gluten free flour
  • 1 tsp cornstarch or tapioca (skippable if needed)
  • pinch salt
  1. Mix all the ingredients in an oiled mug. I use a fork.
  2. Taste test. Add more sugar or chocolate chips if needed. Chopped nuts would be tasty too.
  3. Microwave on high for 1 minute. You should see it puff up. The middle will cook the slowest, so add more time if you see it’s really wet or sagging, unless you like it goey! This one is safe to eat undercooked.

You could also add 2 drops of peppermint extract for mint chocolate brownies, or use peanut butter in place of some of the oil and flour!

Let me know if you try it!

Design a site like this with WordPress.com
Get started